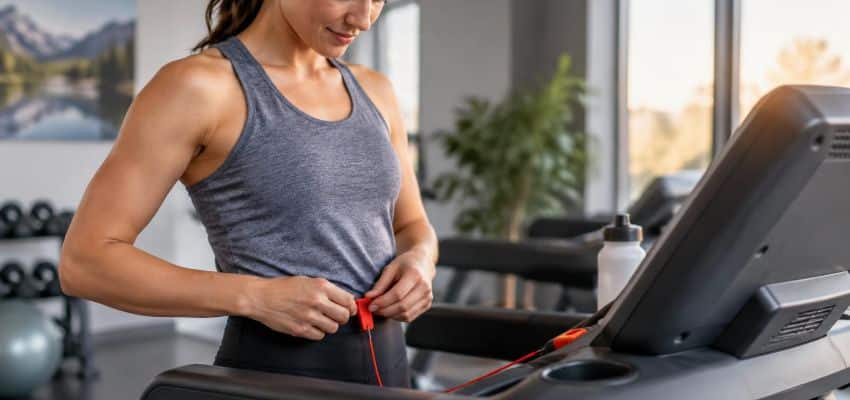
Before pressing Start, connect the correct safety key to its designated point on the treadmill and fasten the clothing clip securely to you. Check the cord, then follow your model’s instructions for testing the stop function.
A key sitting on the console can let the machine run while its clip hangs unused beside you. That leaves out the connection that allows your movement to pull the key free. Check the whole assembly, from the machine to your clothing, before the belt moves.
Start with the belt still. Follow the mounting and startup instructions for your machine; the safety key is one part of treadmill setup, alongside clear space and familiar controls.
On a gym treadmill you have not used before, ask a staff member to show you the key connection and emergency controls.
- Safety key
The removable piece that connects at the treadmill’s designated safety-key point.
- Cord or tether
The link between the key and your clothing clip. A pull on this cord can dislodge the key and trigger the stop function.
- Clothing clip
The end you fasten to yourself so the cord can respond when you move away from the console.
Find Your Model’s Key Connection
Look at the console diagram in the manual, rather than guessing from the color or shape of a loose part. Some keys rest against a magnetic contact area; others insert into a receiver. A nearby metal surface is not necessarily the right location, even if a magnet sticks to it.
There are differences within brands, too. Sunny’s key identification page shows several designs with separate model lists. Match the key to the connection specified for your machine, without forcing it into place.
Clip to Clothing That Holds Firmly
Choose the attachment point recommended in your manual. Depending on the model, that may be a secure waistband or shirt hem. The clip needs a firm hold on the fabric, rather than a loose fold that can slip through its jaws. Check its grip while the belt is stationary.
Picture a clip fastened to the edge of a very loose shirt: the fabric might slide out when the cord pulls, leaving the key attached to the treadmill. That example explains why attaching the clip somewhere on your outfit is not enough.
The attachment needs to hold. If you cannot find a suitable point, resolve that before starting.
Keep the clothing end on you throughout use. Clipping it to the handrail, placing it in the cup holder, or leaving it dangling makes the machine-to-person connection incomplete.
Check the Clip and Cord Before Pressing Start
With the key and clip in place, inspect how the cord sits between them. Do this before the belt moves so you can correct the attachment without dividing your attention between the tether and your footing.
Leave Room to Move Without Snagging
In the position specified for starting your machine, check that the cord does not catch around a rail, phone mount, or another object. It should allow the normal movement described in the manual without tugging the key out.
Its route should also remain clear of anything that could trap or redirect it.
There is no useful universal cord-length measurement for every treadmill and every person. Avoid extending, knotting, taping, or rerouting the tether to solve a fit problem unless your manufacturer explicitly instructs you to do so.
An awkward attachment is a reason to check the instructions before making an adjustment.
Replace Damaged Parts Before Your Workout
Look along the cord and at both ends. Fraying, a cracked clip, a clip that no longer grips, or a damaged key deserves attention before use. A working display does not tell you whether the clothing clip and cord will do their jobs when pulled.
If something is damaged, identify the correct replacement assembly through the manufacturer or gym staff. Do not tape the key into position to keep a session going. You would be securing the very part that needs to release.
-
Clip grips the clothing
Check its hold before the belt moves. Change the attachment if the fabric slips free.
-
Cord has a clear route
Make sure it is not caught around equipment or pulled tight in the normal starting position.
-
Assembly is intact
Inspect the key, cord, and clip for visible damage or missing parts.
This is a setup check. It does not replace the functional test specified by the manufacturer.
Test the Stop Function Using Your Manual
A key recognized by the console does not prove how the whole stop system behaves. A functional test checks the machine’s response when the safety key releases. Because that involves a moving belt on some models, the procedure must come from the instructions for your particular treadmill.
Follow Your Model’s Test Procedure
Find the model number on the machine and open the matching owner’s manual or official support instructions. Search within them for “safety key,” “emergency stop,” or “safety tether.”
Read the complete procedure, including where to stand, how to activate the stop, and what to do afterward. At a gym, ask staff to demonstrate the approved check.
For example, the Atmos instructions specify a weekly test at a slow walking speed, using a pull on the cord to activate the emergency stop. That example applies to the listed Atmos consoles.
Use your own model’s instructions to establish the procedure and schedule for your machine.
-
Confirm the model and procedure
Use the matching manual, including its required position, speed, and test frequency.
-
Carry out the specified test
Follow the entire sequence. Do not invent a faster test or simulate a fall to make the key release.
-
Compare the response and reset as instructed
Check for the response described by the manufacturer. Follow its restart instructions only if the test passed.
Stop Using the Treadmill If the Test Fails
A failed test is not something to compensate for by staying closer to the console or keeping one hand near Stop. End the attempt and contact the manufacturer or gym staff.
Describe what you did and what happened: for example, whether the key released but the belt kept moving, or the key did not release as the procedure described.
Do not continue using a treadmill whose safety-key system fails its prescribed test. Have the problem checked before returning to the machine.
Keep the Clip On Until the Belt Stops
Once you begin, leave the clip attached. If it bothers you or catches repeatedly, stop safely using the machine’s controls. Adjust the setup with the belt stopped, rather than detaching the clip mid-session to get the cord out of the way.
Use Stop for a Normal Finish
Locate the normal Stop control before starting. Follow your manual’s stopping sequence when you finish, and wait for the belt to come to a complete stop before unclipping or stepping off.
The location and behavior of pause, Stop, and emergency controls can vary, so learn the controls on the machine in front of you.
If you accidentally pull the key free, let the machine complete its stop before attempting to reset it. Check what caused the release: a snagged cord, a poor attachment, or movement farther from the console than intended.
Resolve the cause before restarting. Repeatedly replacing the key without checking the setup leaves the same problem waiting for you.
The Key Stops the Belt; It Cannot Catch You
The tether activates a machine control. It cannot support your body weight or guarantee that you will avoid a fall. Wearing it does not make a speed you cannot manage suitable for you.
Choose a comfortable starting speed that lets you stay in control without treating the key as permission to push harder.
Nor should you expect an identical stopping distance on every machine. The XTERRA T3 manual describes a brief coast after key removal, depending on speed. Familiarity with your own treadmill matters more than a general promise that every belt stops instantly.
The key also does not repair a mechanical fault. Stop to investigate belt slipping or a belt drifting sideways before another workout. A clipped tether cannot make a faulty running surface suitable to use.
Missing or Unrecognized Key? Postpone the Run
When a treadmill requires a key, a missing or unrecognized one is a reason to resolve the problem before exercising. Getting the belt to move is not the same as restoring the intended safety system.
Check the Fit Before Assuming a Fault
With the belt stopped, confirm that the key belongs to the model and is seated at the correct connection. Check whether the cord is pulling it out of alignment.
Follow only the external checks and cleaning instructions given for your machine. Avoid spraying cleaner into the receiver or opening the console to investigate.
If the message remains, record its exact wording along with the model and serial number for support. A blank display or refusal to start can have causes beyond the key, so replacing parts at random may not solve it.
Likewise, unexpected treadmill stops during a session should be investigated rather than assumed to be an accidental tug every time.
At a gym, report the machine and choose another one. At home, postpone the session on that machine until the correct part or repair is available. A refrigerator magnet, taped-down key, or altered switch may let a motor run while removing the release function you need.
Match Replacements by Model, Not “Universal”
Begin with your treadmill’s model details and the replacement information in its manual. A similar-looking key or a broad list of brand names does not establish that a part is appropriate for your exact machine. Ask the manufacturer to confirm compatibility when the listing leaves that uncertain.
-
Exact Model Match
Match the full model identifier and revision or year when the parts information distinguishes them.
Look forAn explicit model listing or manufacturer confirmation.AvoidChoosing only by brand name. -
Correct Assembly
Confirm the required key design and whether the replacement includes the appropriate cord and clothing clip.
Look forThe specified part number and assembly.AvoidAssuming a magnet that sticks is a complete replacement. -
Verified Operation After Fitting
Use the prescribed test before returning to exercise with the replacement.
Look forThe response described in your model’s instructions.AvoidTreating a successful startup as the entire check.
Keep a photo of the model label and the confirmed part number with your manual. That small record is useful if the key goes missing later, especially when several machines in the same brand use different parts.
Wait for the belt to stop, unclip the cord, and remove the key. Store it separately, out of children’s reach, and follow your manual’s shutdown instructions. Peloton’s safety guidance also calls for switching off and unplugging its treadmills when not in use. Removing a key does not replace the other precautions specified for your machine. Keep children and pets away, and leave the key where you can find it before your next session – not on the console.